Last time we introduced JQuery featured post widget for blogger. But it got some problems like overlapping the posts and code errors. But now, unlike previous widget, here I'm with new finely working featured post widget for Blogger blogs.

This featured post widget is more advanced in comparison to previous one. Take a look at the working demo of this featured post widget at first.
Demo
If you like it here is how to add it in your Blogger blog.
Step 1:
Go to Blogger > Dashboard > Edit HTML.
Step 2:
Find (Ctrl + F) the tag <body> and just below paste the following code:
Step 3:
Now go to Design > Page Element > Add a Gadget > HTML / JavaScript. Past the following code in it:
Save the widget.
Step 4:
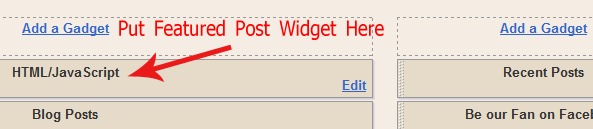
Pace the widget above the 'Blog Post' as shown below:
Finally you are done! View your blog if it is comfortable or not.
Show me your work via comment below and I will include your blog as demo working in this post.
This featured post widget is more advanced in comparison to previous one. Take a look at the working demo of this featured post widget at first.
Demo
If you like it here is how to add it in your Blogger blog.
Step 1:
Go to Blogger > Dashboard > Edit HTML.
Step 2:
Find (Ctrl + F) the tag <body> and just below paste the following code:
<script src='http://www.digitalbunch.com/wp-content/uploads/2011/07/smoothscroll.js' type='text/javascript'/>
<link href='http://www.digitalbunch.com/wp-content/uploads/2011/07/smooth-slider-hacktutors.css' id='smooth_slider_css-css' media='all' rel='stylesheet' type='text/css'/>
<script src='http://www.digitalbunch.com/wp-content/uploads/2011/07/hacktutorsscript.js' type='text/javascript'/>
<script src='http://www.digitalbunch.com/wp-content/uploads/2011/07/jquery-hacktutors.js' type='text/javascript'/>
<script src='http://www.digitalbunch.com/wp-content/uploads/2011/07/slide1.js' type='text/javascript'/>
<style media='screen' type='text/css'>
#smooth_sldr {
width:560px;
height:180px;
background-color:#ffffff;
border:0px solid #999999;
}
#smooth_sldr_items {
padding:10px 18px 0px 26px;
}
#smooth_sliderc {
width:516px;
height:140px;
}
.smooth_slideri {
width:506px;
height:140px;
}
.sldr_title {
font-family:Georgia, Arial, Helvetica, sans-serif;
font-size:20px;
font-weight:bold;
font-style:normal;
color:#000000;
}
#smooth_sldr_body h2 {
line-height:17px;
font-family:Trebuchet MS, Arial, Helvetica, sans-serif;
font-size:14px;
font-weight:bold;
font-style:normal;
color:#000000;
margin:0px 0 5px 0;
}
#smooth_sldr_body h2 a {
color:#000000;
}
#smooth_sldr_body span {
font-family:Arial, Arial, Helvetica, sans-serif;
font-size:12px;
font-weight:normal;
font-style:normal;
color:#333333;
}
.smooth_slider_thumbnail {
float:left;
margin:0px 5px 0 0px;
width:165px;
height:120px;
border:1px solid #000000;
}
#smooth_sldr_body p.more a {
color:#000000;
font-family:Arial, Arial, Helvetica, sans-serif;
font-size:12px;
}
#smooth_sliderc_nav li {
border:1px solid #333333;
font-size:12px;
font-family:Arial, Arial, Helvetica, sans-serif;
}
#smooth_sliderc_nav li a {
color:#000000;
}
.sldrlink {
padding-right:40px;
}
.sldrlink a {
color:#333333;
}
#slider {
background:#333;
height:205px;
display:block;
margin:22px 0 10px 10px;
width:565px;
}
</style>
Step 3:
Now go to Design > Page Element > Add a Gadget > HTML / JavaScript. Past the following code in it:
<div id="slider">Now, replace blue color URL with your post URL. Replace red color URL with your post's image URL. Similarly, replace green color with your post title and pink text with short post description.
<script type="text/javascript">
stepcarousel.setup({
galleryid: 'smooth_sliderc', //id of carousel DIV
beltclass: 'smooth_sliderb', //class of inner "belt" DIV containing all the panel DIVs
panelclass: 'smooth_slideri', //class of panel DIVs each holding content
autostep: {enable: true, moveby:1, pause:7000},
panelbehavior: {speed:500, wraparound: false, persist:false},
defaultbuttons: {enable: true, moveby: 1, leftnav: ['http://www.shoutmeloud.com/wp-content/plugins/smooth-slider/images/button_prev.png', -8, 70], rightnav: ['http://www.shoutmeloud.com/wp-content/plugins/smooth-slider/images/button_next.png', 0, 70]},
statusvars: ['imageA', 'imageB', 'imageC'], //register 3 variables that contain current panel (start), current panel (last), and total panels
contenttype: ['inline'], //content setting ['inline'] or ['external', 'path_to_external_file']
onslide:function(){
jQuery("#smooth_sliderc_nav li a").css("fontWeight", "normal");
jQuery("#smooth_sliderc_nav li a").css("fontSize", "12px");
var curr_slide = imageA;
jQuery("#sldr"+curr_slide).css("fontWeight", "bolder");
jQuery("#sldr"+curr_slide).css("fontSize", "17px");
}
})
</script>
<noscript>
</noscript>
<div id="smooth_sldr">
<div id="smooth_sldr_items">
<div id="smooth_sldr_body">
<div id="smooth_sliderc">
<div class="smooth_sliderb">
<div class="smooth_slideri">
<!-- smooth_slideri --><a href="http://www.hacktutors.info/2010/09/releasing-platinum-blogger-template.html"><img class="smooth_slider_thumbnail" src="https://blogger.googleusercontent.com/img/b/R29vZ2xl/AVvXsEhDgQBLiDxMzhdxp1DPjP2hytqAQTjQQKH1JaXUL43CIR_13d4OK2OvwCqD4yCGzYAB0GGA5etGZhOMi1ZC6n4drOBrnEx13ooOcWuzfgrgRUMe49PmV915sUkteRpctTKJVy7FQTyBL8w/s400/Platinum+Blogger+Template.JPG" alt="Platinum Blogger Template" /></a>
<h2><a href="http://www.hacktutors.info/2010/09/releasing-platinum-blogger-template.html">Platinum Blogger Template</a></h2>
<span>I converted Platinum WordPress theme into Blogger Template. Originally, Brian Gardner designed it and I converted it for all Blogger users and make it available for absolutely free.</span>
<p class="more"><a href="http://www.hacktutors.info/2010/09/releasing-platinum-blogger-template.html">Read More</a></p>
<!-- /smooth_slideri -->
</div>
<div class="smooth_slideri">
<!-- smooth_slideri --><a href="http://www.hacktutors.info/2011/06/google-pagerank-update-june-2011.html"><img class="smooth_slider_thumbnail" src="https://blogger.googleusercontent.com/img/b/R29vZ2xl/AVvXsEhEmEySlcvk2_-YVLTJ7Xh_c_EHakdbK382aoCNSxIUkDAqdRt4SZIZ7Nnh3Y9WVmhBF5eFr8LLwh0Zr_WN_vfOXr45N3ViStWrWj5S5bo1LAzR62XdpOjBKwEdlEhSsZXSIIproX1uoNU/s1600/google-pagerank-update.png" alt="Google Page Rank Update" /></a>
<h2>
<a href="http://www.hacktutors.info/2011/06/google-pagerank-update-june-2011.html">Google Page Rank Update</a>
</h2>
<span>Google PageRank has been updated in June 2011 for the second time in this year. HackTutors got back its PR while it was 0 before. Now its PR 3.</span>
<p class="more"><a href="http://www.hacktutors.info/2011/06/google-pagerank-update-june-2011.html">Read More</a></p>
<!-- /smooth_slideri -->
</div>
<div class="smooth_slideri">
<!-- smooth_slideri -->
<a href="http://www.hacktutors.info/2011/05/high-pr-backlinks-within-minute.html"><img class="smooth_slider_thumbnail" src="https://blogger.googleusercontent.com/img/b/R29vZ2xl/AVvXsEiUPRWSYYxmP3UIoP9etRgsF_G9TuSQmnnLbSdcVsZTPDT6TdG0ZrZkHW0oDjcBn-PQGOe8s3By6lz5Frxp2IMswq9vX1QS0PFwWhM1GIxiLm0-myCWi5Xyh4mXZtoJpSX5jzahSCDZaek/s1600/FinalWSOcover.png" alt="Get Thousands of High PR Backlinks Within a Minute" /></a>
<h2><a href="http://www.hacktutors.info/2011/05/high-pr-backlinks-within-minute.html">Get Thousands of High PR Backlinks Within a Minute</a></h2>
<span>Now, you can discover up to *PR 7 DoFollow Pages* to place your Backlinks instantly! Yes you don't have to wait for a minute.</span>
<p class="more"><a href="http://www.hacktutors.info/2011/05/high-pr-backlinks-within-minute.html">Read More</a></p>
<!-- /smooth_slideri -->
</div>
<!-- /smooth_slideri -->
</div>
</div>
</div>
</div>
<ul id="smooth_sliderc_nav">
<li><a id="sldr1" href="#" >1</a></li>
<li><a id="sldr2" href="#" >2</a></li>
<li><a id="sldr3" href="#" >3</a></li>
</ul>
<br class="sldrbr" />
<div class="sldrlink"><a href="http://www.clickonf5.org/smooth-slider" target="_blank">Smooth Slider</a></div>
</div>
</div>
<script type="text/javascript">
jQuery(document).ready(function(){
jQuery('#smooth_sliderc_nav a').click(function() {
var id = jQuery(this).attr('id');
var step_to_slide = id.replace(/sldr/, "");
document.getElementById(id).href = "javascript:stepcarousel.stepTo('smooth_sliderc', "+step_to_slide+")";
});
});
</script>
Save the widget.
Step 4:
Pace the widget above the 'Blog Post' as shown below:
Finally you are done! View your blog if it is comfortable or not.
Show me your work via comment below and I will include your blog as demo working in this post.